2021.07.21 TIL (Today I Learned)
TIL (Today I Learned)
BoostCamp Challenge DAY-3
- Study Crawling : DOM과 Selector, JSON
- Study LRU 알고리즘 : JavaScript로 구현하기
- Study JavaScript : 기본 입출력
Study Crawling
🤔 Crawling, 왜 필요할까?
웹 서버와 웹 클라이언트가 요청을 보내고, 응답을 주고 받는 과정을 이해하고, 웹 브라우저가 동작하는 방식을 이해하는 것은 매우 중요하다. 그 중에서도 웹 크롤링으로 데이터를 자동화해서 수집하는 것은 필요한 기술이면서도, 법적으로 침해하지 않아야 하는 선을 지켜야 하는 기술이다. 웹 크롤링으로 수집한 데이터를 LRU 캐시 방식으로 처리하도록 구현해보면서 node 모듈을 다루고, 데이터를 처리하는 방식에 익숙해져야 한다.
💡 먼저 이해할 것
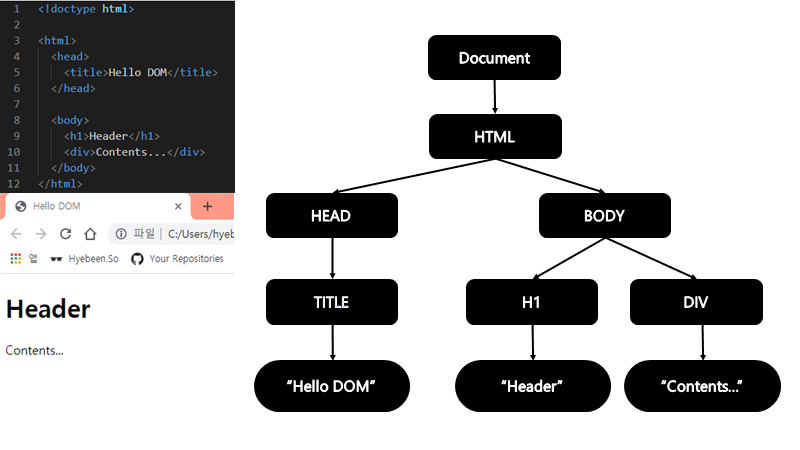
WEB 페이지는 일종의 문서(document)이다. 웹 브라우저를 통해 그 내용이 해석되어 웹 브라우저 화면에 나타나거나 HTML 소스 자체로 나타나기도 한다. 웹 페이지는 DOM 구조를 따름으로써 프로그래밍 언어와 연결될 수 있다.(interface)
우리가 .txt 형식의 파일(문서)를 메모장과 같은 편집기로 실행시키는 것처럼, chrome과 같은 웹 브라우저를 이용해서 .html과 같은 형식의 파일(문서)를 실행시키는 것이다.
Windows의 경우 브라우저에서 Ctrl + o를 누르면 파일(문서)을 열 수 있는데, 이 것은 메모장(및 대부분의 프로그램)에서 파일을 여는 단축키와도 같다는 것을 깨달았다.
DOM
- DOM, The Document Object Model
- nodes, property, method를 갖고 있는 object로 문서를 표현한다.
- 메모리에 문서의 구조(html 등)를 표현함으로써 웹 페이지와 스크립트언어(js 등) 또는 프로그래밍 언어를 연결한다.
- 문서를 logical tree로 표현한다.
- 트리의 각 branch는 node에서 끝난다.
- 각 node는 객체를 갖는다.
- DOM method를 사용해서 프로그래밍적으로 트리에 접근할 수 있다.
- 이를 통해 문서의 구조, 스타일, 콘텐츠를 변경할 수 있다.
- javascript와 같은 언어로 DOM을 활용하여 HTML을 조작할 수 있다.
- DOM Interface
- 문서의 구조화된 표현(structured representation)을 제공한다.
- 프로그래밍 언어가 DOM구조에 접근 및 변경할 수 있는 방법을 제공한다.
※ JavaScript와 같은 스크립팅 언어를 이용해 수정가능 - 많은 object가 여러 개의 다른 interface와 연관이 있다.
- 예시 : table object는
createCaption,insertRow등의 method가 포함된HTMLTableElement interface를 implements한 것이다. 그러나HTML element라서Element interface도 implements한다. 또,HTML element는 DOM과 관련해서 node tree에서 하나의 node 이므로Node interface도 implements 한다. 아래와 같이 table object를 참고하면 이 3가지 interface (HTMLTableElement interface,Element interface,Node interface) 를 사용할 수 있다.
  var table = document.getElementById("table");
  var tableAttrs = table.attributes; // Node/Element interface
  for (var i = 0; i < tableAttrs.length; i++) {
  // HTMLTableElement interface: border attribute
  if(tableAttrs[i].nodeName.toLowerCase() == "border")
      table.border = "1";
  }
  // HTMLTableElement interface: summary attribute
  table.summary = "note: increased border";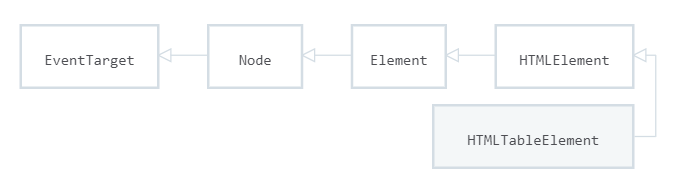
- 예시 : table object는
문서 : HTML, XML, SVG 등
Fundamental DOM data types
- Document
- Document interface는 브라우저에 의해 로드된 웹 페이지이다.
- Web page’s content(DOM Tree)의 entry point를 제공한다. (root)
- DOM Tree는
<body>와<table>및 여러 다른 element로 구성되어 있다.
- DOM Tree는
- Document는 페이지의 URL을 얻거나 문서에 새로운 element를 생성하는 등의 기능을 전역적으로(globally) 제공한다.
- Document interface는 모든 종류의 문서에 대한 공통의 properties와 methods를 설명한다.
- 문서의 유형에 따라서 더 다양한 API가 존재한다.
- Element
- HTML elements reference
- element는 웹페이지를 구성한다. (An element is a part of a webpage.)
- element는 data item, text 묶음 또는 image를 포함할 수 있고, 아무것도 포함하지 않을 수도 있다.
- 일반적인 element는 여는 태그(
<)와 attributes, text content, 그리고 닫는 태그(>)로 구성된다.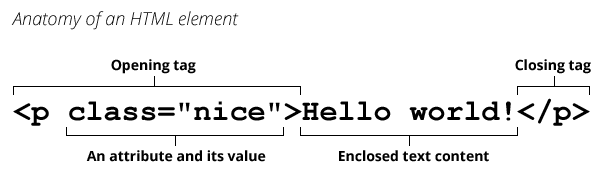
- NodeList
- collections of nodes (Not an Array)
- Array로 변환(convert)하는 방법
var div_list = document.querySelectorAll('div'); // returns NodeList var div_array = Array.prototype.slice.call(div_list); // converts NodeList to Array - Array로 변환(convert)하는 방법
- returned by
Node.childNodes와 같은 property 또는document.querySelectorAll()와 같은 methods. - Live vs. Static
- Live NodeList : DOM의 변경 사항을 실시간으로 collection에 반영한다.
ex ) Node.childNodes - Static NodeList : DOM을 변경해도 collection에 영향을 주지 않는다.
ex ) document.querySelectorAll()
※ NodeList 를 순회(iterate)하거나 리스트의 길이를 캐시(cache)해야 할 때, Static NodeList를 사용하는 것이 좋다.
- Live NodeList : DOM의 변경 사항을 실시간으로 collection에 반영한다.
- 예제
for loof,for...of loof,foreach()를 사용하여 순회(iterate)가 가능하다.
  // ex1
  for (var i = 0; i < myNodeList.length; ++i) {
  var item = myNodeList[i];  // Calling myNodeList.item(i) isn't necessary in JavaScript
  }
//ex2 var list = document.querySelectorAll( 'input[type=checkbox]' ); for (var item of list) { item.checked = true; }//ex3 var elements = document.querySelectorAll(".suggestions"); NodeList.prototype.addEventListener = function(event, func) { this.forEach(function(content, item) { content.addEventListener(event, func); }); } function log() { console.log(this, " was clicked"); } elements.addEventListener("click", log); //or elements.addEventListener("click", function() { console.log(this, " awas clicked"); });
※
for...in loof는 NodeList의 길이(length)와 항목 속성(item properties)까지 열거한다. 또한 고정된 순서(order)를 보장하지 않는다. 고정된 순서(order)로 items(nodes)만 열거하고 싶다면for...in loof를 사용하면 안된다.DOM에 대해 이해한 것을 실습해볼 겸
for...in loof와for...of loof로 각각 NodeList를 순회하는 테스트를 해보았다.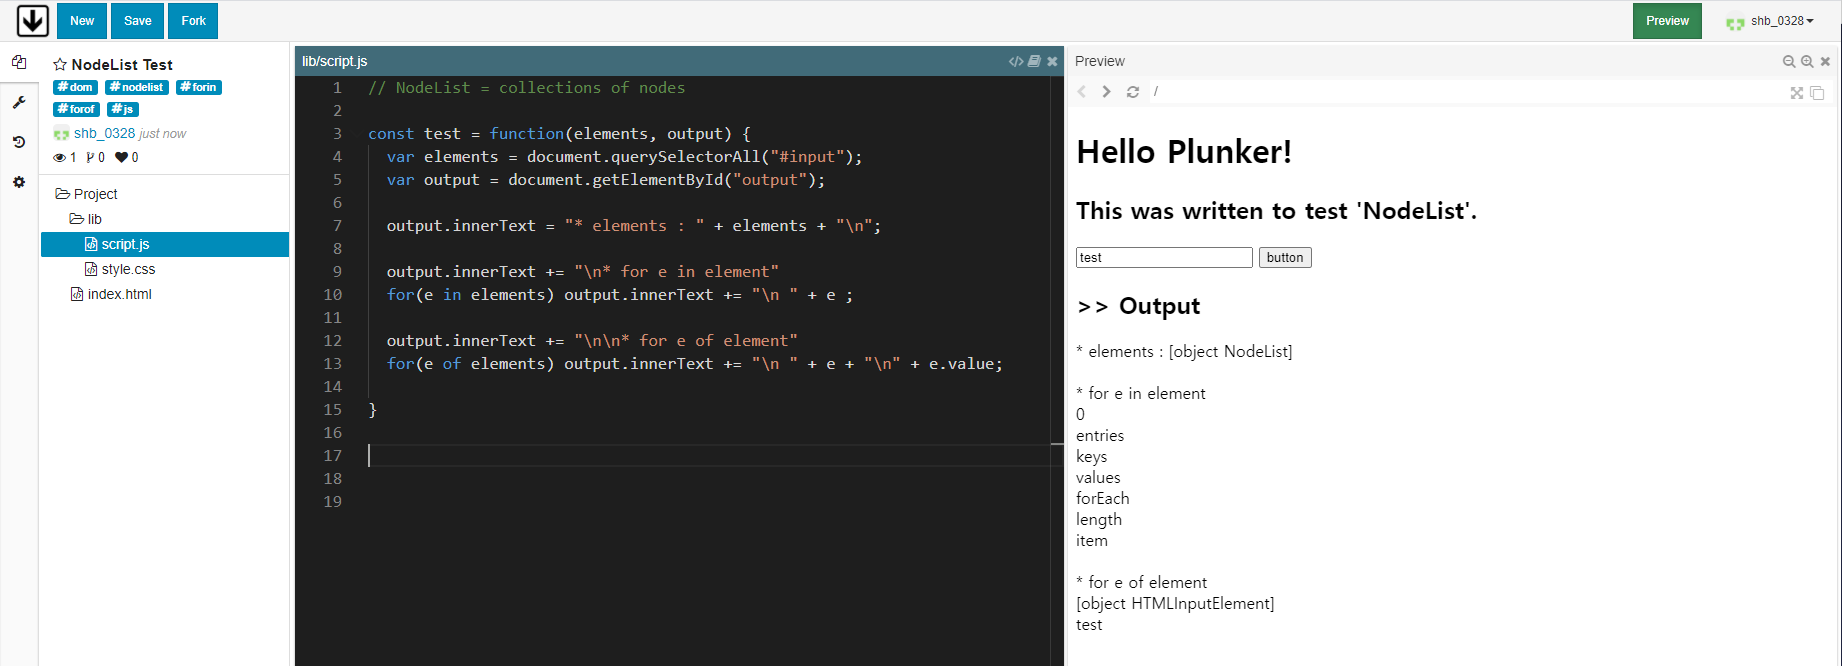
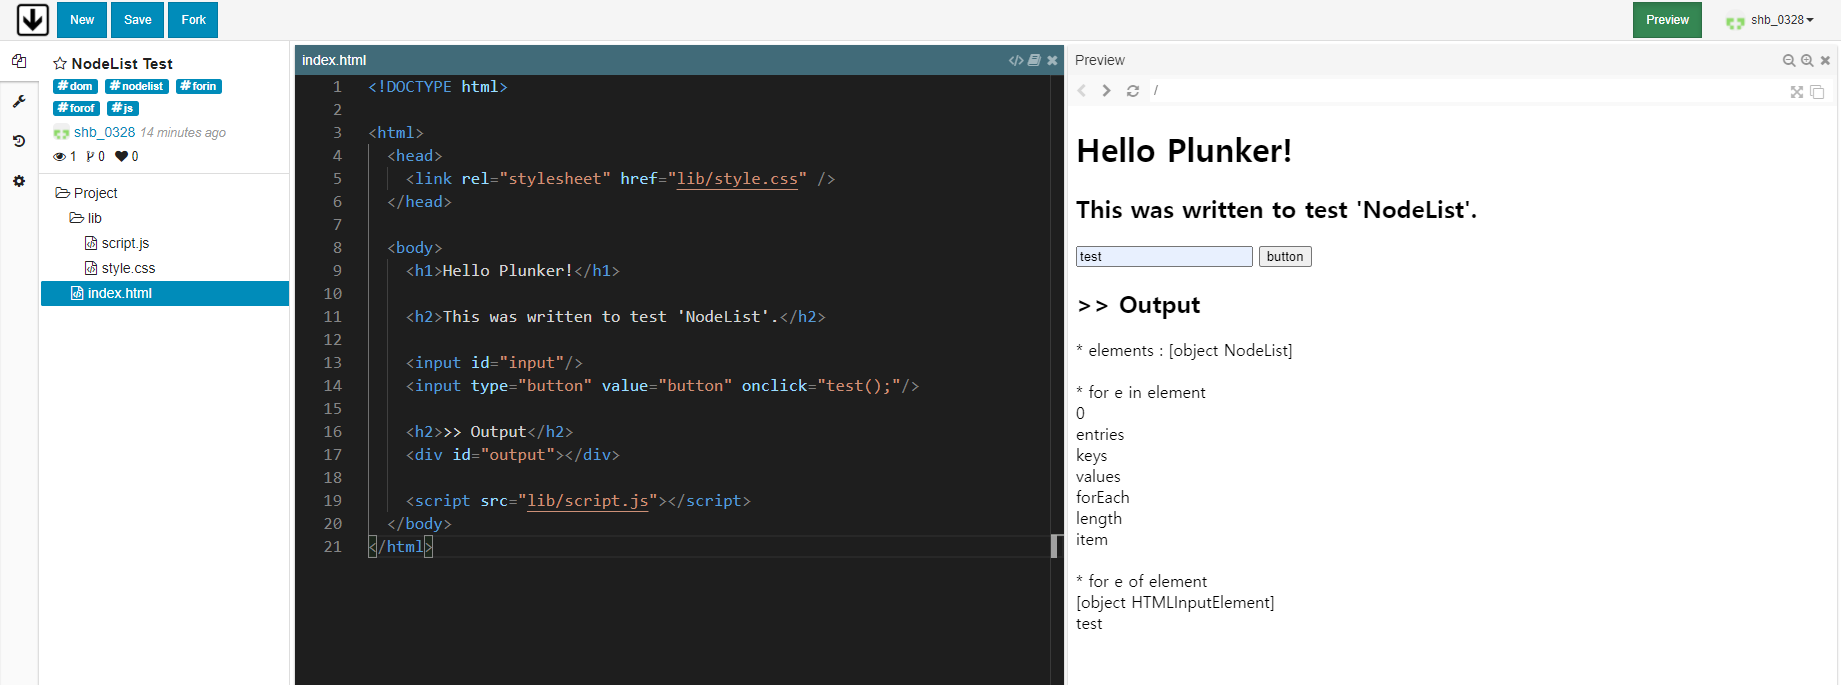
script.js
  const test = function(elements, output) {
  var elements = document.querySelectorAll("#input");
  var output = document.getElementById("output");

  output.innerText = "* elements : " + elements + "\n";

  output.innerText += "\n* for e in element"
  for(e in elements) output.innerText += "\n " + e ;

  output.innerText += "\n\n* for e of element"
  for(e of elements) output.innerText += "\n " + e + "\n" + e.value;

  }
index.html
  <!DOCTYPE html>

  <html>
      <head>
          <link rel="stylesheet" href="lib/style.css" />
      </head>

      <body>
          <h1>Hello Plunker!</h1>

          <h2>This was written to test 'NodeList'.</h2>

          <input id="input"/>
          <input type="button" value="button" onclick="test();"/>

          <h2>>> Output</h2>
          <div id="output"></div>

          <script src="lib/script.js"></script>
      </body>
  </html>
위 실습의 결과,
for...in loof를 이용해서elements를 순회하여HTMLInputElement를 출력해보면 length를 포함한 다양한 property가 열거되는 것을 확인할 수 있다. 반면에,for...of loof를 이용해서elements를 순회해보면,e출력 시 객체이름이 나오고,e.valueproperty를 출력했을 때, input으로 입력했던 값이 출력되는 것을 확인할 수 있다.document.querySelectorAll("#input")가 return한 NodeList를elements변수에 저장했다. NodeList안에 node 객체가 하나 들어있는데inputtag에 의해 만들어진HTMLInputElement객체이다.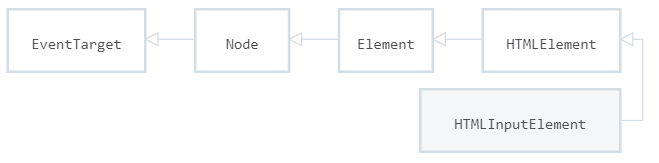
HTMLInputElement는 상속관계에 의해Node interface를 implements 하기 때문에 node로써 NodeList에 item이 될 수 있다. - collections of nodes (Not an Array)
- attribute
- namedNodeMap
💜Plunker
http://plnkr.co/ https://github.com/plnkr
Plunker is an online community for creating, collaborating on and sharing your web development ideas.
Plunker는 웹 개발 아이디어를 만들고, 공동 작업하고 공유하기위한 온라인 커뮤니티이다. 오픈 소스로 Plunker의 소스 코드는 GitHub에서 찾을 수 있다. (Plunker의 Starter templates, Runtime, sdk 가 대부분 TypeScript로 작성되어 있는 것을 확인할 수 있었다.) 다른 사람들과 결과물을 공유하고 다른 사람들의 결과물을 수정해볼 수도 있다. 간단한 소스를 테스트해보면서 학습하기 좋을 것 같다. DOM Tree에 대한 설명이 잘 나와있는 사이트를 찾았는데 Plunker를 활용하여 게시글이 작성되어있다. 어떻게 한 건지 알아보고 다음에 적용해봐야겠다.
Github 계정과 연동하여 로그인이 가능하다.

더 많은 UI Development Online Editor (HTML/CSS/JavaScript)
Study JavaScript
readline
- readline 모듈은 한 번에 한 줄씩 Readable 스트림 (예 : process.stdin)에서 데이터를 읽기위한 인터페이스를 제공한다.
Readable 스트림
process.stdin
😥 NOT DONE
- Selector
- JSON
- Crawling
- LRU
- readline
TIF (Today I Felt)

모른다고 알게된 것의 범위가 확장되고 있음을 느낀다. 노른자(익숙한 것)의 크기를 키우는 것은 상당한 시간이 소요된다. 꾸준히 조금씩 해보자.
Reference